How to make a candy strip friendship bracelet
November 12, 2022
Materials
- 4 Colors of Embroidery Floss (1 strings of each color measuring 24 inches.)
- Scissors
- Tape
- Clipboard or notebook
Preparation
- Even though this bracelet is depicted as the most beginner friendly, in order to start making the bracelet, we need to go over some basic preparation.
- How to prepare strings
- Pick any four colors of string you want to use
- Now, with the colors that have been chosen, take one color and cut exactly 1 piece of string, measuring exactly 24 inches with your scissors. Long, colorful string is best for this bracelet, they make it stand out more and more likely to become the size of your wrist.
- Repeat the last step with the other remaining colors chosen.
- You should now have 4 strings, 1 of each color. Check and count to make sure this information matches your strings.
- Gather all your strings together and make sure they all line up from top to bottom and one isn’t longer than the other pieces together.
- Tie the first 3 inches of the top of your bracelet to create a circular knot. Just like you see below.
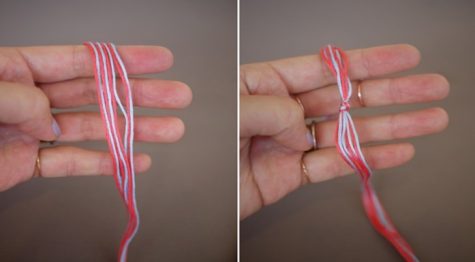
- Take a flat notebook or clipboard and lay the bracelet on it. Take a piece of tape and tape only the part with the knot. The strings below the knot should not be taped.
- How to Make a Forward Knot
- Pick up the first string after you’ve laid down the pattern
- Take that first string and place it outwards, and then take a point going outwards and have it overlap the second string horizontally, so it looks like a 4 shape as seen on step 3 below.

- Take the part of the first string that is on the right which is going straight and wrap it under the second string where the four shape is ending
- Pull tightly so the knot is tight and reaches all the way to the top
- Repeat steps 1-5 with the same strings
Important information
- A forward knot is 2 knots so steps 1-5 will teach you how to make one half of a forward knot. For a complete forward knot, you must do steps 1-5 two times for a complete forward knot.
- Make sure when doing the second half of the forward knot, you use the same strings in the same exact position as the first half of the knot. Most people don’t know that to make a forward knot, it must be done twice.
- How to make a forward knot after the last one
- After making a forward knot, you might wonder how to make the next one. The string that used to be the first one in the row is now second in the row.
- Next, take that new second string (which used to be the first) and make a forward knot with it and the third string in the row.
How to make a candy-striped friendship bracelet
- Go through the basic preparation above, and use the “How to Prepare Strings” section to have your strings and knots set.
- Read the “How to Make a Forward Knot” and make sure you understand the steps needed to make a complete forward knot.
- Take the first string and make a forward knot with the second one.
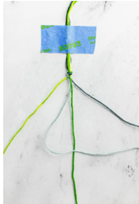
- Take that first string that should have moved to the second strings spot and make a forward knot with the third string in the row as seen above in the picture.
- Take the string that was in the first spot when first starting (now should be the third one in the row) and make a forward knot with the last string in the row as seen in the picture below.

- After making the last forward knot, you might see there are no more strings to continue. Now, you must leave that original first string (it should now be the last string in the row)
- Take the new first string in the row (it should have been the second one in the original starting row) and repeat the forward knot process with all the other strings in the row.
Important Information
- After the string is done making a forward knot at the last string in the row, there is no special thing to do after, just immediately start making the next row.
8. Now, repeat the process each color being a different row, making a pattern.
9. When the bracelet gets long enough, make a simple knot at the end and leave 5 inches of string after the knot, and cut off the rest.
How your bracelet should look :
![]()
Ending
How to tie bracelet onto hand
- Wrap bracelet around wrist
- At the end, with the 5 inches of extra string, split the 4 strings into 2 sides—both with 2 strings each
- Use 2 sides to tie around the circle knot above the pattern by sliding both sides inside the circle knot
- Tie both strings together 3 times